Fedora 30 - Win10 - GPU passthrough
Preamble
There are a lot of articles already online about the subject and a lot of this blog is inspired from those articles online. This post is more about how I handled my configuration and settings.
Hardware configuration
I built my PC years ago and only ever upgraded the GPUs. Therefore this configuration might be considered old-ish and there are certainly more settings to date in hardware (MOBOs especially) that could contain even more options.
CPU: i7-4930k GPU0: Asus 1080Ti GPU1: Asus 1080Ti Motherboard: Asus Rampage IV Black Edition
Objectives
So, I made the move to fully use Linux as my main OS and have been very happy with it. However, there are numerous games which to date do not have Linux Support. Despite that my favorite and most played game (Factorio) is completely availabe on Linux, it doesn't make for intensive LAN parties playing FPS.
So what I wanted to do here, given that I have 2 GPUs pretty powerful, and Linux doesn't really seem to have a working SLI implementation (not that I could notice anyway), I thought I could dedicate the second GPU to a Windows VM, and stream from that VM (Steam will stream from the Windows machine to the Linux Machine) to my main machine. Therefore, I do not even need a second keyboard or screen to play games. I purely stream !
We are going to setup the machines in a way that will allow:
Host machine will have GPU0 in-use and use NVIDIA driver (we will disable nouveau)
VM Guest will use the GPU in GPU-Passthrough
Rationale
Why do I want to stream from the second machine ? Ever since I bought this PC, I only ever wanted to run VMs on it and passthrough hardware. I very successfully had achieved that for numerous months using VMWare ESXi. So, I know it works, but I wanted to move away from something that not all people can have and use my (so far with Manjaro) favorite distro.
Today I have the PC in my office/room at home. Tomorrow, I want to have a small cabinet in the house wih PSUs, etc. and the network gear, and for any "workstation" to be a cheap Intel NUC or something like a Raspberry Pi, and that's it. Then I can make my office be anywhere and / or play on the laptop with the same experience as playing on a much beefier machine. Of course the quality and experience of that depends on the network that one has. I run wires everywhere I can so latency and throughtput are optimal for all the way up to 4k@60fps.
Otherwise, will add an extra post to use Looking Glass which seems like a very promising!
Let's dive in!
Note
All configuration files that worked for my machine are available on Github
Note
After crashing my machine a few times and doing a reset, please ensure that the machine you are going to use for the next steps doesn't contain data that is important to you. If so, back it up !
Enable GPU passthrough for the GPU.
Warning
This is where your configuration and mine are going to differ. Therefore, take all the steps with a grain of salt and do not blindly copy-paste the values that I am setting in various configuration files.
So, before installing NVIDIA drivers etc. which is rather straightforward we are going to start with the hard stuff. Why? Because if you mess up, like I did many times, you won't feel the frustration of having done all the work before and having to redo it again.
First things first, let's make sure we have all the latest upgrades.
sudo dnf upgrade -y
reboot
Install Virtualization
sudo dnf install @virtualization -y
My installed packages and versions:
qemu-kvm --version
QEMU emulator version 3.1.1 (qemu-3.1.1-2.fc30)

rpm -qa | egrep 'kvm|libvirt|qemu)'
libvirt-daemon-5.1.0-9.fc30.x86_64
libvirt-daemon-driver-storage-sheepdog-5.1.0-9.fc30.x86_64
libvirt-daemon-driver-nwfilter-5.1.0-9.fc30.x86_64
libvirt-daemon-driver-interface-5.1.0-9.fc30.x86_64
libvirt-daemon-driver-storage-iscsi-5.1.0-9.fc30.x86_64
libvirt-daemon-driver-storage-mpath-5.1.0-9.fc30.x86_64
qemu-kvm-3.1.1-2.fc30.x86_64
libvirt-daemon-config-nwfilter-5.1.0-9.fc30.x86_64
libvirt-daemon-driver-storage-logical-5.1.0-9.fc30.x86_64
libvirt-daemon-driver-libxl-5.1.0-9.fc30.x86_64
libvirt-client-5.1.0-9.fc30.x86_64
libvirt-libs-5.1.0-9.fc30.x86_64
libvirt-daemon-driver-qemu-5.1.0-9.fc30.x86_64
libvirt-daemon-driver-storage-scsi-5.1.0-9.fc30.x86_64
libvirt-daemon-driver-vbox-5.1.0-9.fc30.x86_64
libvirt-glib-2.0.0-3.fc30.x86_64
libvirt-daemon-driver-lxc-5.1.0-9.fc30.x86_64
libvirt-daemon-driver-storage-rbd-5.1.0-9.fc30.x86_64
libvirt-daemon-driver-secret-5.1.0-9.fc30.x86_64
libvirt-5.1.0-9.fc30.x86_64
libvirt-daemon-driver-storage-core-5.1.0-9.fc30.x86_64
libvirt-daemon-driver-storage-gluster-5.1.0-9.fc30.x86_64
libvirt-daemon-driver-storage-zfs-5.1.0-9.fc30.x86_64
libvirt-daemon-driver-storage-disk-5.1.0-9.fc30.x86_64
python3-libvirt-5.1.0-2.fc30.x86_64
libvirt-daemon-kvm-5.1.0-9.fc30.x86_64
libvirt-daemon-driver-storage-iscsi-direct-5.1.0-9.fc30.x86_64
libvirt-bash-completion-5.1.0-9.fc30.x86_64
libvirt-daemon-driver-network-5.1.0-9.fc30.x86_64
libvirt-daemon-driver-storage-5.1.0-9.fc30.x86_64
libvirt-daemon-config-network-5.1.0-9.fc30.x86_64
libvirt-daemon-driver-nodedev-5.1.0-9.fc30.x86_64

uname -r
5.3.6-200.fc30.x86_64
Enable IOMMU in /etc/sysconfig/grub
/etc/sysconfig/grub
GRUB_TIMEOUT=5
GRUB_DISTRIBUTOR="$(sed 's, release .*$,,g' /etc/system-release)"
GRUB_DEFAULT=saved
GRUB_DISABLE_SUBMENU=true
GRUB_TERMINAL_OUTPUT="console"
GRUB_CMDLINE_LINUX="rhgb quiet intel_iommu=on iommu=pt"
GRUB_DISABLE_RECOVERY="true"
GRUB_ENABLE_BLSCFG=true
grub2-mkconfig -o /boot/efi/EFI/fedora/grub.cfg
Now we can reboot and check that IOMMU is enabled.
Check IOMMU is enabled after reboot
dmesg | grep -i -e DMAR -e IOMMU
From Arch Documentation this script allows to check your IOMMU Groups and the devices in these.
#!/bin/bash
for d in /sys/kernel/iommu_groups/*/devices/*; do
    n=${d#*/iommu_groups/*}; n=${n%%/*}
    printf 'IOMMU Group %s ' "$n"
    lspci -nns "${d##*/}"
done
Identify your GPU (GPU1) PCI address.
lspci -vnn |less
Note
I have two identical GPUs therefore they have the same vendor ids. Most guides online only manage the devices to passthrough via vfio.conf in modprobe.d( ie. options vfio-pci ids=10de:13c2,10de:0fbb). I won't be using that at all given this would not work for identical GPUs
Add device address to modprobe
03:00.0 VGA compatible controller [0300]: NVIDIA Corporation GP102 [GeForce GTX 1080 Ti] [10de:1b06] (rev a1) (prog-if 00 [VGA controller])
     Subsystem: ASUSTeK Computer Inc. Device [1043:85ea]
     [...]
     Kernel driver in use: nouveau
     Kernel modules: nouveau

03:00.1 Audio device [0403]: NVIDIA Corporation GP102 HDMI Audio Controller [10de:10ef] (rev a1)
     Subsystem: ASUSTeK Computer Inc. Device [1043:85ea]
     [...]
     Kernel driver in use: snd_hda_intel
     Kernel modules: snd_hda_intel
/etc/modprobe.d/vfio.conf
install vfio-pci /usr/bin/vfio-pci-override.sh
Setup VFIO module settings
/usr/bin/vfio-pci-override.sh
#!/bin/sh
for boot_vga in /sys/bus/pci/devices/*3*/boot_vga; do
    if [ $(<"${boot_vga}") -eq 0 ]; then
        dir=$(dirname -- "${boot_vga}")
        for dev in "${dir::-1}"*; do
            echo $dev
            echo 'vfio-pci' > "${dev}/driver_override"
        done
    fi
done
modprobe -i vfio-pci
Here pay attention that I have specifically aimed for the devices in 0000:03: only because that is the BUS in which my GPU is into. Adapt accordingly to your needs and addresses.
sudo chmod 755 /bin/vfio-pci-override.sh
sudo chown root:root /bin/vfio-pci-override.sh
/etc/dracut.conf.d/vfio.conf
add_drivers+="vfio_pci vfio vfio_iommu_type1 vfio_virqfd"
install_items+="/usr/bin/vfio-pci-override.sh /usr/bin/dirname"
sudo dracut --force
sudo lsinitrd | grep vfio

-rw-r--r--   1 root     root           74 Feb 14  2019 etc/modprobe.d/vfio.conf
-rwxr-xr-x   1 root     root          250 Feb 14  2019 usr/bin/vfio-pci-override.sh
drwxr-xr-x   3 root     root            0 Feb 14  2019 usr/lib/modules/5.3.6-200.fc30.x86_64/kernel/drivers/vfio
drwxr-xr-x   2 root     root            0 Feb 14  2019 usr/lib/modules/5.3.6-200.fc30.x86_64/kernel/drivers/vfio/pci
-rw-r--r--   1 root     root        25284 Feb 14  2019 usr/lib/modules/5.3.6-200.fc30.x86_64/kernel/drivers/vfio/pci/vfio-pci.ko.xz
-rw-r--r--   1 root     root        11752 Feb 14  2019 usr/lib/modules/5.3.6-200.fc30.x86_64/kernel/drivers/vfio/vfio_iommu_type1.ko.xz
-rw-r--r--   1 root     root        12088 Feb 14  2019 usr/lib/modules/5.3.6-200.fc30.x86_64/kernel/drivers/vfio/vfio.ko.xz
-rw-r--r--   1 root     root         3220 Feb 14  2019 usr/lib/modules/5.3.6-200.fc30.x86_64/kernel/drivers/vfio/vfio_virqfd.ko.xz
grub2-mkconfig -o /boot/efi/EFI/fedora/grub.cfg
Now the time of truth. Reboot and see what driver is enabled for the device
lspci -nnv
01:00.0 VGA compatible controller [0300]: NVIDIA Corporation GP102 [GeForce GTX 1080 Ti] [10de:1b06] (rev a1) (prog-if 00 [VGA controller])
     Subsystem: ASUSTeK Computer Inc. Device [1043:85e4]
     [...]
     Kernel driver in use: nouveau
     Kernel modules: nouveau

01:00.1 Audio device [0403]: NVIDIA Corporation GP102 HDMI Audio Controller [10de:10ef] (rev a1)
     Subsystem: ASUSTeK Computer Inc. Device [1043:85e4]
     [...]
     Kernel driver in use: snd_hda_intel
     Kernel modules: snd_hda_intel


03:00.0 VGA compatible controller [0300]: NVIDIA Corporation GP102 [GeForce GTX 1080 Ti] [10de:1b06] (rev a1) (prog-if 00 [VGA controller])
     Subsystem: ASUSTeK Computer Inc. Device [1043:85ea]
     [...]
     Kernel driver in use: vfio-pci
     Kernel modules: nouveau

03:00.1 Audio device [0403]: NVIDIA Corporation GP102 HDMI Audio Controller [10de:10ef] (rev a1)
     Subsystem: ASUSTeK Computer Inc. Device [1043:85ea]
     [...]
     Kernel driver in use: vfio-pci
     Kernel modules: snd_hda_intel
As you can see, the devices we want to isolate has vfio-pci driver loaded Another way to check whether it worked, is to use nvidia-smi if you already have replaced nouveau.
nvidia-smi
Fri Oct 18 14:28:30 2019
+-----------------------------------------------------------------------------+
| NVIDIA-SMI 430.50       Driver Version: 430.50       CUDA Version: 10.1     |
|-------------------------------+----------------------+----------------------+
| GPU  Name        Persistence-M| Bus-Id        Disp.A | Volatile Uncorr. ECC |
| Fan  Temp  Perf  Pwr:Usage/Cap|         Memory-Usage | GPU-Util  Compute M. |
|===============================+======================+======================|
|   0  GeForce GTX 108...  Off  | 00000000:01:00.0  On |                  N/A |
|  0%   25C    P5    24W / 275W |    402MiB / 11175MiB |     10%      Default |
+-------------------------------+----------------------+----------------------+
+-----------------------------------------------------------------------------+
| Processes:                                                       GPU Memory |
|  GPU       PID   Type   Process name                             Usage      |
|=============================================================================|
|    0      1407      G   /usr/libexec/Xorg                            201MiB |
|    0      1885      G   /usr/bin/kwin_x11                             92MiB |
|    0      1891      G   /usr/bin/krunner                               2MiB |
|    0      1893      G   /usr/bin/plasmashell                          89MiB |
|    0      2115      G   /usr/bin/akonadi_archivemail_agent             3MiB |
|    0      2123      G   /usr/bin/akonadi_mailfilter_agent              3MiB |
|    0      2126      G   /usr/bin/akonadi_sendlater_agent               3MiB |
|    0      2127      G   /usr/bin/akonadi_unifiedmailbox_agent          3MiB |
+-----------------------------------------------------------------------------+
A little bit of tuning before we create our VM
Enable HugePages
I would not be the best person to explain the reasons behind using huge pages (which for a guy who had to reimplement malloc at school is pretty bad :/) but there are plenty of guides that explain the benefit of using huge pages.
I picked up these numbers myself, they are probably not the best ones but they do work. I always go for ^2 numbers because it is always easier / faster for a computer to go with ^2 numbers.
/etc/sysctl.conf
# sysctl settings are defined through files in
# /usr/lib/sysctl.d/, /run/sysctl.d/, and /etc/sysctl.d/.
#
# Vendors settings live in /usr/lib/sysctl.d/.
# To override a whole file, create a new file with the same in
# /etc/sysctl.d/ and put new settings there. To override
# only specific settings, add a file with a lexically later
# name in /etc/sysctl.d/ and put new settings there.
#
# For more information, see sysctl.conf(5) and sysctl.d(5).

vm.nr_hugepages=8192
vm.hugetlb_shm_group=64
sysctl -p
/etc/security/limits.conf
# /etc/security/limits.conf
#
#This file sets the resource limits for the users logged in via PAM.
#It does not affect resource limits of the system services.
#
#Also note that configuration files in /etc/security/limits.d directory,
#which are read in alphabetical order, override the settings in this
#file in case the domain is the same or more specific.
#That means for example that setting a limit for wildcard domain here
#can be overriden with a wildcard setting in a config file in the
#subdirectory, but a user specific setting here can be overriden only
#with a user specific setting in the subdirectory.
#
#Each line describes a limit for a user in the form:
#
#<domain>        <type>  <item>  <value>
#
#Where:
#<domain> can be:
#        - a user name
#        - a group name, with @group syntax
#        - the wildcard *, for default entry
#        - the wildcard %, can be also used with %group syntax,
#                 for maxlogin limit
#
#<type> can have the two values:
#        - "soft" for enforcing the soft limits
#        - "hard" for enforcing hard limits
#
#<item> can be one of the following:
#        - core - limits the core file size (KB)
#        - data - max data size (KB)
#        - fsize - maximum filesize (KB)
#        - memlock - max locked-in-memory address space (KB)
#        - nofile - max number of open file descriptors
#        - rss - max resident set size (KB)
#        - stack - max stack size (KB)
#        - cpu - max CPU time (MIN)
#        - nproc - max number of processes
#        - as - address space limit (KB)
#        - maxlogins - max number of logins for this user
#        - maxsyslogins - max number of logins on the system
#        - priority - the priority to run user process with
#        - locks - max number of file locks the user can hold
#        - sigpending - max number of pending signals
#        - msgqueue - max memory used by POSIX message queues (bytes)
#        - nice - max nice priority allowed to raise to values: [-20, 19]
#        - rtprio - max realtime priority
#
#<domain>      <type>  <item>         <value>
#

#*               soft    core            0
#*               hard    rss             10000
#@student        hard    nproc           20
#@faculty        soft    nproc           20
#@faculty        hard    nproc           50
#ftp             hard    nproc           0
#@student        -       maxlogins       4

# End of file

soft memlock 16777216
hard memlock 16777216
Install OVMF - UEFI for KVM
sudo dnf install dnf-plugins-core
sudo dnf config-manager --add-repo https://www.kraxel.org/repos/firmware.repo
sudo dnf install edk2.git-ovmf-x64
Now locate the files.
find /usr -name "OVMF_CODE.fd" -type f
/usr/share/edk2/ovmf/OVMF_CODE.fd
Note
You can otherwise simply use the ones in /usr/share/OVMF/ which would have came with @virtualization
Create network bridge
Note
This is an optional step if you intend to use a virtual network (only between the VM and your PC).
Note
The name of your interface will vary from mine so adapt accordingly
nmcli connection delete Wired\ Connection\ 1
nmcli connection add type bridge ifname br0
nmcli connection add type bridge-slave ifname eno1 master br0
nmcli connection up bridge-br0

# Next ones are optional, just for myself
nmcli connection modify bridge-slave-eno1 ethernet.auto-negotiate yes
nmcli connection modify bridge-br0 bridge.mac-address <eno1 mac address>
Installing Windows 10
So this part which should be trivial is not, because NVIDIA is greedy: you already spent a lot of money for a GPU Chip, you then rely on NVIDIA to update and release drivers. VFIO is fairly old as a tech, I was doing it already in VMWare about 6 years ago. NVIDIA figured out that people were running VMs and so they implemented a driver locking: by default, if your GPU is running inside a VM and NVIDIA knows about it, it will keep the GPU from running normally in Windows and return a code error 43.
So, let's embark on installing Windows 10 so we can play some non Linux native games.
I will be using virt-manager for most of the operations to come and then edit manually the XML definition.
VirtIO or no VirtIO
Note
This is not about how to VFIO your network card to the VM. If you wanted to do that, simply adapt your vfio-install script to add your Network Device.
Before we jump right into this, you might want to prepare a couple things if you intend to use VirtIO drivers for your Machine. There are no particular reasons that I can think of today to do this. However, in the past from using virtio drivers everywhere, I had really good performances. So in this guide I will add the extra optional steps to use a VirtIO disk for the OS and for the network card.
More information here
 sudo wget https://fedorapeople.org/groups/virt/virtio-win/virtio-win.repo -O /etc/yum.repos.d/virtio-win.repo
 sudo dnf install virtio-win
To ensure that you have the drivers available as you install Windows, create a second CD Rom storage and mount the drivers ISO. Once in windows setup, bottom left, you will find a
1. Create our Win10 VM
Requires:
Windows License (I mean, you can run it without it but I can't be held responsible for you hacking it).
VirtIO drivers ISO (if you are using Virtio for HDD too).
Your GPU to have been isolated to attach it.
Note
Pro-Tip: If you are new to Virt-manager and KVM, notice the Browse Local button which allows you to mount a file from anywhere. However, you need to
Virt-Manager makes it super easy to do that. So let's do the domain creation quickly.
Select source -> ISO -> Windows ISO
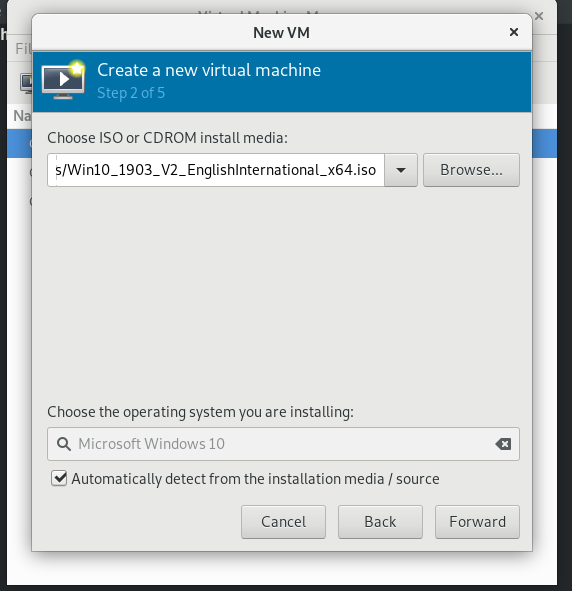
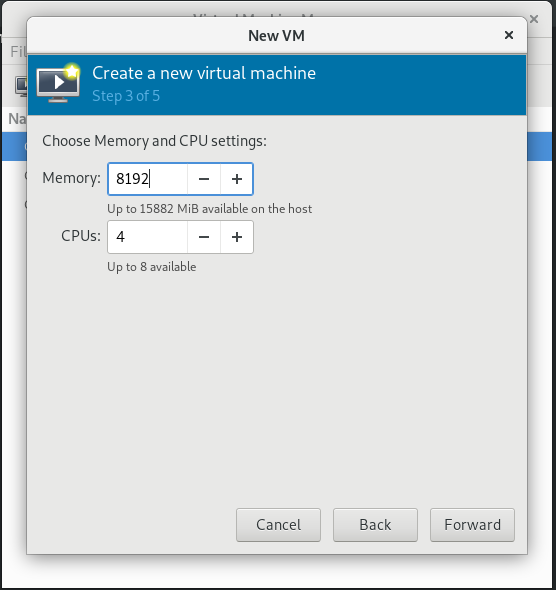
Set CPU/RAM -> I recommend 4 vCPU at least and 8GB of RAM. Depends on your available capacity.
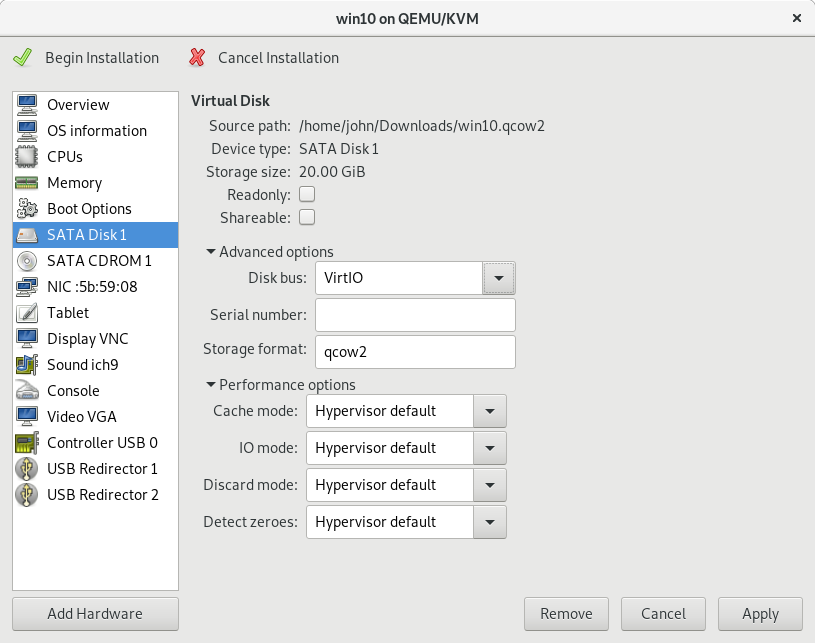
Set Storage Size and pool -> I went for 128GB disk in a new pool that I created in my home folder.

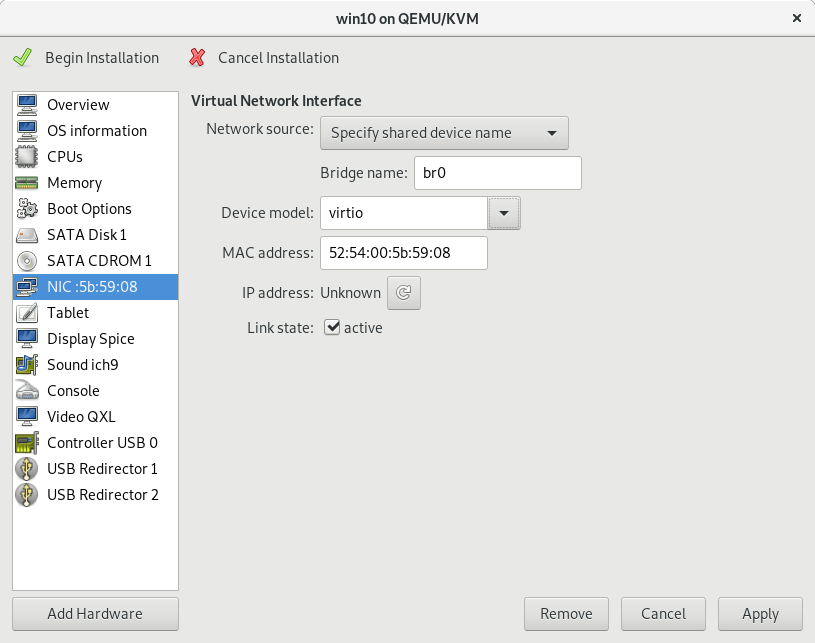
Set network to the bridge -> br0 for me.
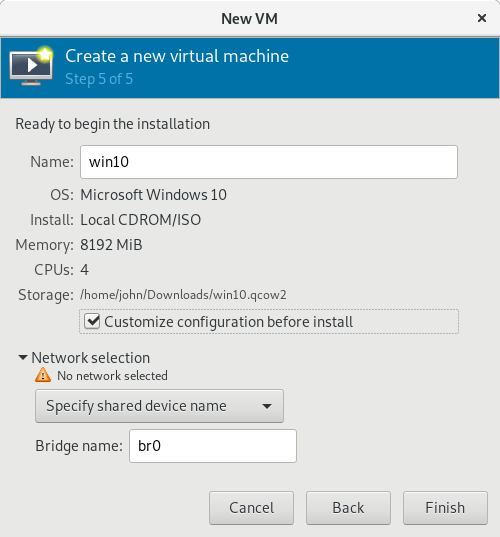
Warning
Tick the box for custom before install so it doesn't start the VM. If you forgot to tick the box and wanted to make changes, do so and then re-enable the boot devices from the CDROM.
Boot options

Optional - Virtio Disk
Optional - Virtio Network
Note
For all future files edit, I will do it with
virsh edit win10 # where win10 is the name of the VM you created in VirtManager
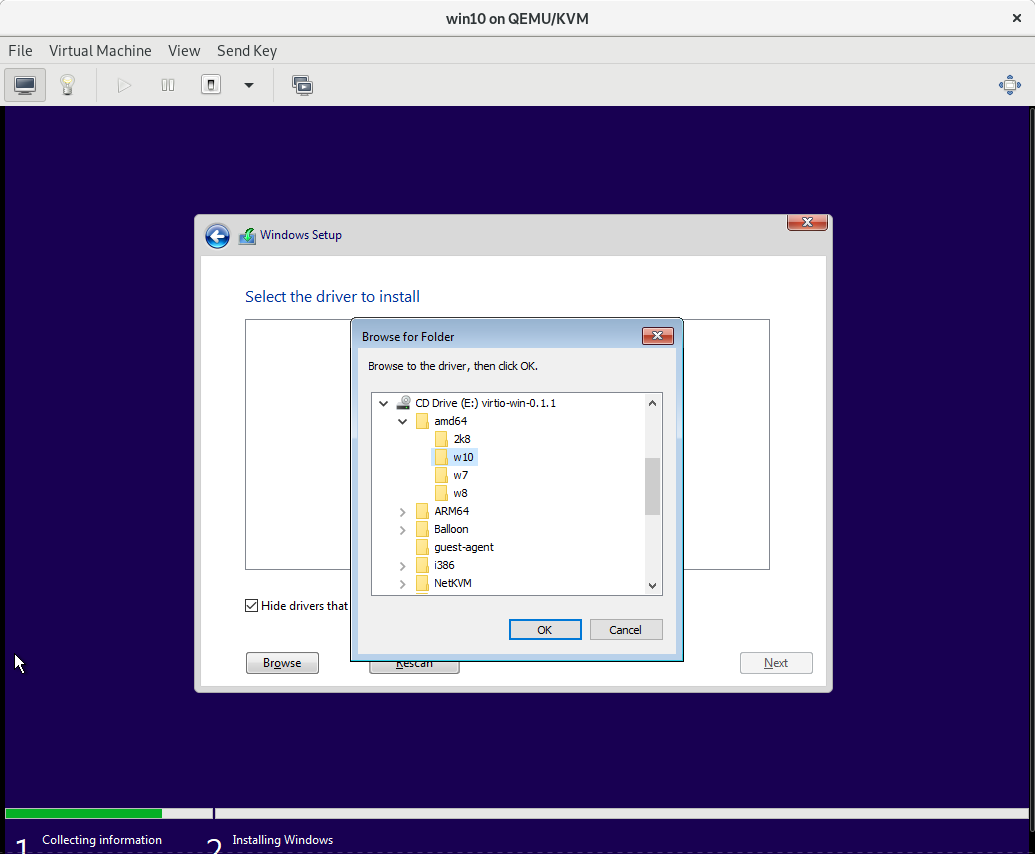
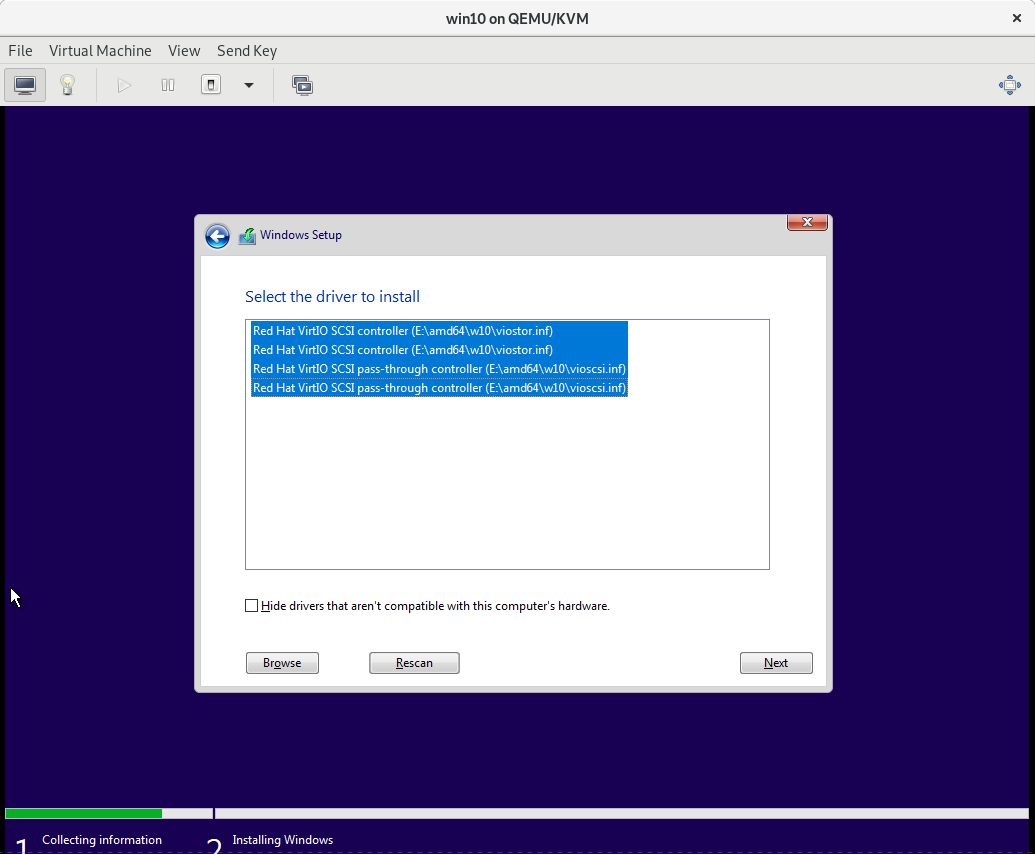
Optional - Windows 10 find VirtioDrivers at install
Click on Load Drivers -> Navigate to the Secondary Disk.
Modify domain to include mode schemas
<domain type='kvm' id='3' xmlns:qemu='http://libvirt.org/schemas/domain/qemu/1.0'>
Memory tuning
Adding the huge page as the backend for our VM.
  <currentMemory unit='KiB'>16777216</currentMemory>
  <memoryBacking>
    <hugepages/>
  </memoryBacking>
CPU Pinning and tuning
CPU pinning is optional. It allows to bind a vCPU to a CPU core/thread of your machine.
  <iothreads>1</iothreads>
  <cputune>
    <vcpupin vcpu='0' cpuset='2'/>
    <vcpupin vcpu='1' cpuset='3'/>
    <vcpupin vcpu='2' cpuset='6'/>
    <vcpupin vcpu='3' cpuset='7'/>
    <emulatorpin cpuset='0-1'/>
    <iothreadpin iothread='1' cpuset='0-1'/>
    <vcpusched vcpus='0' scheduler='fifo' priority='1'/>
    <vcpusched vcpus='1' scheduler='fifo' priority='1'/>
    <vcpusched vcpus='2' scheduler='fifo' priority='1'/>
    <vcpusched vcpus='3' scheduler='fifo' priority='1'/>
  </cputune>
  <cpu mode='host-passthrough' check='partial'/>
H. Fake NVIDIA
So NVIDIA driver figures out that there is some information that tells it is not running bare metal but in a VM. Greedy as they are, they want you to get expensive Quadro cards etc. for this usage... So we are going to cheat on NVIDIA.
Add a vendor_id to the hyperv
Instruct KVM to hide itself from the OS
  <features>
    <acpi/>
    <apic/>
    <hyperv>
      <relaxed state='off'/>
      <vapic state='off'/>
      <spinlocks state='off'/>
      <vendor_id state='on' value='1234567890ab'/>
    </hyperv>
    <kvm>
      <hidden state='on'/>
    </kvm>
    <vmport state='off'/>
    <ioapic driver='kvm'/>
  </features>
Note
The other settings in hyperv do not seem to make much difference. In previous posts online, found a lot of people suggesting to turn these off. For consistency turning these off here, but seems like it doesn't make much of a difference at all.
Install Windows

Don't forget to turn off as much $h17 as possible from MS' services and otherwise-wares...

( I could not decide which GIF was best to illustrate my thinking)

Install NVIDIA drivers
From within your VM, downlaod the drivers and install them. Link for drivers
Once the installation is done, reboot the VM.
The moment of truth
Note
I highly recommend to have connected the passthrough GPU to a monitor/TV to feel the joy of seeing the screen turn on! But also it seems Windows will prefer that over the VGA device of KVM
Boot your VM if not just reboot from the NVIDIA drivers install. If all went well, your GPU will turn on, you will see the UEFI display come up, and a few seconds later, you should have the Windows login page show up before your eyes on your second monitor / TV.
If it doesn't go back to the Device Manager to figure out if the card is properly setup. If you have another Error code 43, I would recommend buying an ATI GPU... Joke aside, using the EFI boot for Windows is what my Error Code 43 from NVIDIA, everything else was done but that...
Note
Pro Tip: If like me you intend to stream your games as opposed to have a secondardy screen / monitor to play with, save yourself a lot of pain and get yourself a HDMI or Display Port Ghost dongle. Connect a real monitor so you can set the resolution and frequency of that fake second monitor and then disconnect that real monitor. Why ? Because this will fake Windows into using the GPU and allow you to stream.
Note
For those of you (like me) who then use RDP to control Windows, steam etc. but then want to stream, you will have to disconnect from RDP. Doing so the normal way will close your user session. To keep the session open but shut RDP off, you can use this script